Application to Shingles Requirements:
Shingle Sealer’s product instructions specifically state that all damaged areas, including existing leak areas, should be repaired before application. In-other-words it’s crucial to identify and repair existing leaks or damage, such as cracks, loose seams, or damaged shingles prior to application.
Ignoring existing leaks can lead to the coating failing prematurely or aggravating existing problems. When or if repairs are necessary and are completed, it is essential to ensure that the roof is structurally sound, and the shingles are clean & dry; thus, allowing the coating to adhere properly and provide long-lasting protection.
Shingle Sealer features a durable two-part acrylic formula with technology designed to bond to worn damaged roofing surfaces providing a strong coating to help preserve and extend the life of the roof.
When to Apply Shingle Sealer Clear Shingle Roof Sealer
Here are some basic guidelines:
Pictures should always be taken of the roof condition prior to being serviced.
Cleaning is always required before application when or if mold, mildew and or rubbish such as leaves or twigs are present.
Shingle Sealer must be applied under dry conditions. Applying to a damp surface could cause haziness or loss of adhesion.
Air temperatures should be above 45°F and below 90°F during sealer application. It is best to perform the application in the morning hours due to the heat of the shingles. Heat directly impacts the workability of the sealer. The hotter it is the faster it will dry onto the shingle.
Do not apply Shingle Sealer when rain is forecast within the upcoming 24 hours.
How to apply Shingle Sealer Shingle Roof Sealer:
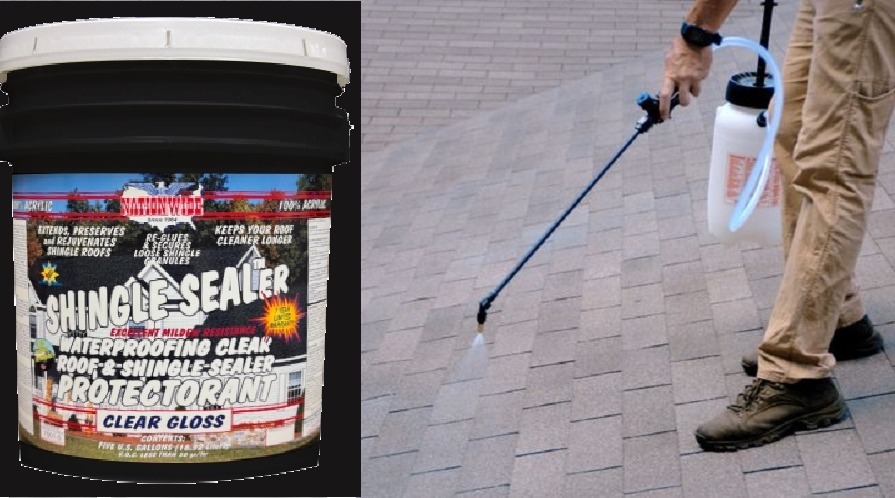
Using the right tools is critical to achieving the best coverage rate and sealer thickness for optimal performance. The most common method of applying the sealer is using a pump-up sprayer and roller for back rolling when necessary. The Shingle Sealer Technical Data Sheet recommends the following application techniques to achieve best results.
- Begin the application from the low side of the roof and work your way up. This helps eliminate streaking from excess runoff if it occurs.
- Ensure that the sprayer maintains proper pressure to produce a consistent even stream of product onto the shingles. Avoid using sprayers that drip or cause splatter.
- Maintain tip about 8 to 10 inches from the surface being treated and apply with steady, even strokes in a manageable area (300 sq ft intervals recommended). Strive to achieve the recommended maximum coverage of 300 square feet per gallon, depending on the porosity and condition of the shingles being treated.
- Continue this until you reach a good break point and then begin again at an adjoining area starting again at the low side of the roof—working each section up against the previous wet area. Continue this until entire roof is covered with first layer.
- Allow to dry, (requires about 60 min.) and apply each additional coat ‘thinner’ in a perpendicular or diagonal pattern to the previous coat. This will ensure coverage in areas that may be missed or is too thin.
How Many Coats?
The most important rule to remember is that less is more. A thin coat is all that’s needed. Shingle Sealer recommends applying the sealer a minimum of two thin coats with the first coat servicing 300 square feet per gallon. When applying second coat of sealer, apply it in the opposite (perpendicular) or diagonal direction to the prior coat so as to ensure even coverage of 300 square feet per 1/2 gallon. Always wait to apply the second coat of sealer for the time recommended (1 hour); again, in a perpendicular pattern again using a 1/2 gallon for even coverage of the previous 300-foot coverage area.
Roof Care Guide
If you want to keep your roof looking great for a long time after sealing, follow the following steps:
- Perform routine inspections. – Inspections should be made at least twice a year. Once in the spring and once in the fall.
Spring inspections help identify any winter damage from ice or snow.
Fall inspections identify any repairs needed for the upcoming winter.
Always inspect your roof after hailstorms or excessive winds that could affect the roofing system.
- Keep your roof clean of debris – debris on the roof will hold water and cause the shingle and sealer to deteriorate. Keep the roof’s valleys free of debris and keep your gutters and downspouts open to ensure proper drainage.
- Keep surrounding tree branches pruned to prevent limbs from hanging over the roof. – Tree limbs or branches touching the roof will scrub and cause damage to the sealer and the roof. Pruning also helps prevent varmints such as squirrels and or raccoons from climbing onto the roof.
- Secure loose shingle tabs. Whenever you have a loose shingle, it can be fixed by either replacing the shingle or using a little roof cement to secure it back into place. Regularly inspect previously caulked areas to prevent the re-emergence of previous leak areas.
- Keeping you roof clean is important. It is recommended to clean your roof annually or more frequent if needed depending on your environmental conditions.
- Never use high water pressure devises or harsh chemicals to clean your roof. Water and laundry grade detergents are all that is necessary to safely maintain your roof.
_____________________________________________________